Note: this article was written in 2003 or 2004. Gimp probably changed unrecognizeably since then, and none of this may be applicable anymore. I haven't used it since then.
If you are viewing this page not in a frame, you will not see the images. Please click here to view it in a frame. Yes, the good old HTML frames. I wasn't kidding about this article being written in the early 2000s.
This article describes a procedure on how to create images that are shaped like puzzle pieces, like I did on some of my pages. Not that I'm so presumptuous as to think anyone would want to copy my idea. :-) So let's say I wrote this article mostly for myself, in case years from now I'll be scratching my head "how the hell did I do this"? Which happens to me a lot! :-)
However, in a year since this article was written, Gimp has changed significantly, and not all for the better. I'm saddened that they got rid of the Dynamic Text filter. I guess its functionality is supposed to be incorporated into Text tool, but, alas, the Text tool isn't nearly quite as good. It often locks up in mysterious ways and doesn't seem to have as much functionality as Dynamic Text filter. Still, I think the things described in this article should be possible to do with the Text tool. It's just that I'm not going to rewrite this article (not in the near future, anyway), to start refering to the Text tool instead of Dynamic Text filter. :-( And keep in mind that everything in this article refers to the older version of Gimp (I'm too lazy to investigate which version it was. I don't have it on any of my computers anymore.) Hence, some menus and keyboard shortcuts may be inaccurate.
I'll first present a high level overview for those familiar with Gimp. If you understand the concept of layers, a high level overview may be all you need. The puzzle is created in these steps:
Note: I describe the operations primarily in terms of keyboard shortcuts. It's my opinion that keyboard shortcuts are very handy when you are repeating the same sequence of operations many times, and I assure you'll be doing a lot of that in this process. :-) (Unless you automate it.) Keyboard shortcuts are much faster to use than the mouse and minimize the tedium.
Decide how wide the puzzle should be, pixel-wise. A thing to keep in mind is the width of the viewers' screen: you don't want your viewers to have to scroll left and right. I limited my puzzles to 600 pixels of width, although modern monitors can handle much more than that.
Decide how wide each individual image -- a puzzle piece -- should be. E.g. 200 pixels, 300 pixels? Note: the protruding parts will make the actual dimensions of most pieces bigger. For example, you may decide that the width of the entire puzzle will be 600, and each piece will be 200 x 200 pixels, therefore you'll have 3 pieces per row. But when you draw the puzzle, you'll see that because of the protruding parts most puzzle pieces (except the ones that don't have protruding parts) will be either taller than or wider than 200 pixels. That's something to keep in mind.
Having decided the width of the puzzle and the dimensions of individual pieces will tell you approximately how many pictures you want to have per row. Knowing how many pictures you want to put in the puzzle, you can now decide how many rows the puzzle needs to have. Once you know that, you can calculate the exact width and height of the puzzle.
For example, I wanted my puzzle to be 600 pixels wide, and each of the puzzle pieces to be approximately 200 x 200. That means having 3 puzzle pieces per row. I have 18 pictures I want to compose the puzzle of, so my puzzle had to have 6 rows. 6 x 200 = 1200 gave me the height of my puzzle. Of course, puzzle pieces don't have to be of the same height and width. You can vary height and width independently.
Now you can create a new image.[How to create a new image.] In the top Width and Height fields of the New Image dialog box enter the width and height of the entire puzzle that you computed in the previous step. Leave all the other settings default.
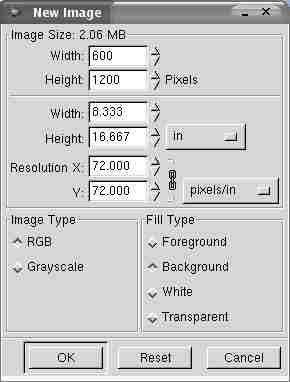
Figure 1. A New Image window with Width and Height set
to the numbers you computed in Step 1.
Next you'll create the outline of the puzzle. Right-click on the newly created image. In the menu that opens, select Filters->Render->Pattern->Jigsaw. In the Jigsaw dialog box, set the horizontal and vertical number of tiles to be numbers of horizontal and vertical rows calculated in Step 1. Set Bevel Width to 0 and Highlight to 0. That will make sure that the lines separating the puzzle pieces will be as thin as possible. (Beveled edges and highlights will come later, in Step 3.)

Figure 2. A Jigsaw dialog box with Horizontal number
of tiles set to 3 and Vertical set to 6.
At this point your image should be a white rectangle with a puzzle outline. I'll refer to this image futher in the text as the main image, because soon you'll have several other images open and we'll need to differentiate between them. Open Layers, Channels and Paths window, if it's not already open, by right-clicking on the image and selecting Layers->Layers, Channels and Paths. Notice that it has only one layer so far, named "Background".
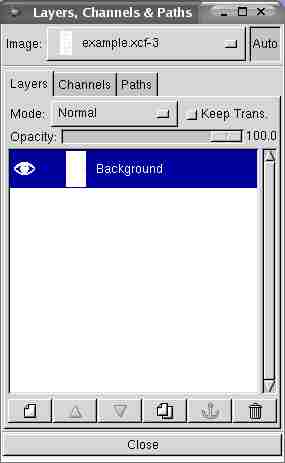
Figure 3. Layers, Channels and Paths window showing
only one layer, Background.
This is the most difficult, most creative and least automated part of the work. You now have to decide which image to put on which part of the puzzle. Since the puzzle pieces form a rectangular field, I'll further refer to them as chess squares, e.g. A1, A2, ..., B1, B2, where rows are named by letters and columns by numbers.

Figure 4. The numbering of the puzzle
pieces
Let's say you did some preliminary eyeballing and tentatively decided which should fit where. For example, image X should fit on piece B2. Let's open image X. After you opened it, while its window is selected, click Ctrl+D. This will duplicate the image. You want to work with the duplicate, since you'll probably have to resize and/or crop it several times before you figure out an ideal way to overlay it with a puzzle piece, and you don't want to damage the original image.
The image is probably bigger than the puzzle piece, so let's resize the duplicate to a size that you think will make it the best fit for the puzzle piece. I don't think there is an exact way to calculate its optimal size. Most likely you can't just make it the same size as the puzzle piece, since the "funny" shape of the puzzle piece complicates the matters.
Resizing is done by right-clicking on the image and selecting Image->Scale Image. In the dialog box that opens, notice the section "Pixel Dimensions" that has 4 input fields: New Width, New Height, Ratio X and Y. We'll manipulate the numbers in one or more of these boxes. Below it there is another section, "Print Size and Display Unit" that has similarly named input fields, but we'll disregard those for now.
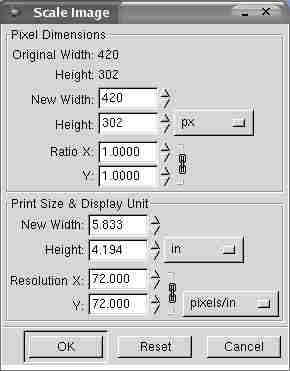
Figure 5. Scale Image dialog box
You can resize an it in two ways: by changing one of the dimensions (width or height), or by entering a new X or Y ratio. Notice a little chain icon to the right of Ratio X and Y fields. By default it shows a linked chain. That means that if you change one of the dimensions, the other will change automatically; that is, your image will be resized proportionally. You can disable this feature and change each dimension independently, if you wish. For that, click on the chain icon. It will now show a broken chain. But for now I'll assume you want to resize your image proportionally. Click on the chain again so it becomes intact.
You can now set either the Width or the Height to be the number of pixels you want; then put the cursor in the other field (Width if you changed Height, or Height if you changed Width), and you'll see that the number in it automatically changed in proportion to the change in the first dimension. But perhaps you don't know what the new heigth or width should be: you just know you want to reduce them to, say, one half or one third of the old dimensions. Then you can enter this number (0.5 or 0.3 or whatever you want) into Ratio X or Y field, and put the cursor in the other field; the number in it will be adjusted automatically.
A tip to make it easier to estimate the dimensions of the resized image. A good place to start is to make at least one of its dimensions (height or width) similar number as the corresponding dimension of the puzzle piece B2. How will you know what exactly are the dimensions of B2? The approximate dimensions we talked about earlier - e.g. 200x200 -- can be severely inacurate, because the protruding parts can make a puzzle piece much longer or wider . You can find out the exact dimensions of B2 this way. In Layers, Channels and Paths window, highlight the Background layer (make it your working layer). In The Gimp window, click the Fuzzy selection tool.
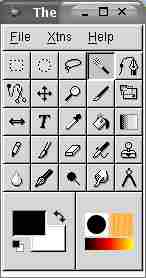
Figure 6. Fuzzy selection tool is the one "pressed
in". If you move the mouse over it, you'll see a tool tip "Select
contiguous regions".
Now when you move the mouse over the main image, the mouse cursor
changed its shape to a fuzzy selection tool. Click anywhere inside the
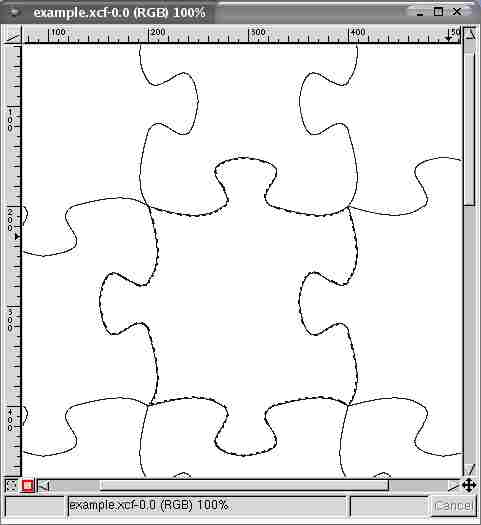
B2 piece. Notice that a selection outline ("marching ants") appeared
around the B2 piece.

Figure 7. Selection outline around the B2
piece.
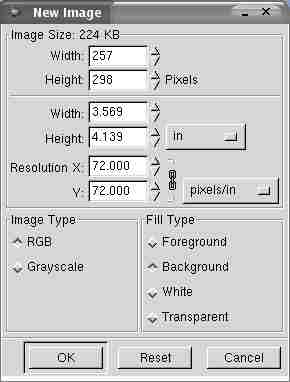
Figure 8. New Image dialog box showing actual
dimensions of B2.
Even though in this example we initially divided the puzzle into 200 x 200 pixel squares, we see that the actual dimensions of B2 are 257 x 298 pixels. The dimensions are bigger because of B2's protruding parts. That's something to keep in mind when planning the layout of the puzzle. All of its pieces have bigger dimensions than they would if you simply divided the puzzle into rectangles.
After you resized the duplicate of image X, select the whole image. [How to select the whole image] Copy the image. [How to copy a selection] Next, put the focus on the main image window. (Since you will soon have several images open, you'll have to pay attention to which one is currently in focus, so as to be aware where your keystrokes and commands go.) Press Ctrl+V, this will paste the (now resized) duplicate of image X into the main image. Before you do anything else, notice what happened in Layers, Channels and Paths window. A new layer has been added, named "Floating Selection".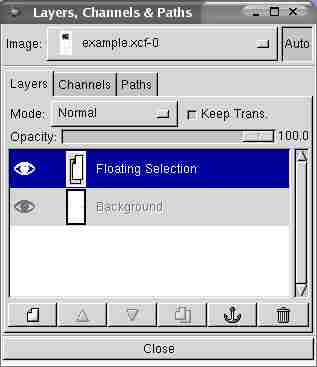
Figure 9. Immediately after you paste a new image into
the main image, and before you do anything else, a "Floating
Selection" layer appears in Layers, Channels and Paths.
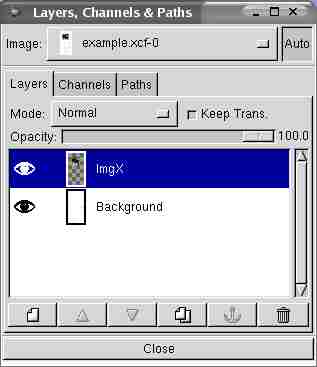
Figure 10. Layers, Channels and Paths window
with two layers: ImgX and Background.
It's a point worth repeating: if at this point instead of two layers you have only one, you have accidentally merged the newly pasted image with the Background layer, and you need to Undo until "Floating Selection" layer returns. Each image needs to be in a separate layer otherwise you won't be able to cut out puzzle pieces.
The concept of a layer. It is useful here to say a few words about the concept of a layer, since this work is based on manipulation of layers. The layers in an image let you manipulate some objects in the image without touching others. Most actions you do with an image are limited to the layer that's currently selected (highlighted in Layers, Channels and Paths window). Let's call it the working layer. At all times you need to pay attention to which layer is currently the working layer and make sure it's the right one, otherwise your actions may affect the objects you don't want to affect.Next we'll move ImgX around so that it will best fit puzzle piece B2. For that, we need to put a selection around B2. In The Gimp window, click the Fuzzy selection tool. Now when you move the mouse over the main image, the mouse cursor changed its shape to a fuzzy selection tool. In Layers, Channels and Paths make Background your working layer. Click anywhere inside the B2 piece. Notice that a selection outline ("marching ants") appeared around the B2 piece. This selection outline will serve you as a guide for positioning ImgX layer accurately.
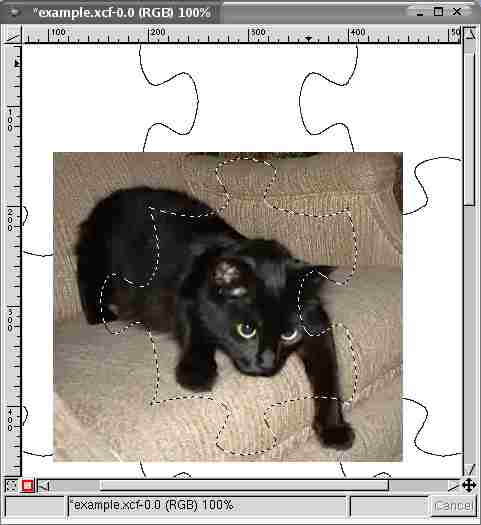
Figure 11. The selection outline around B2 is showing
"under" ImgX (the cat image).
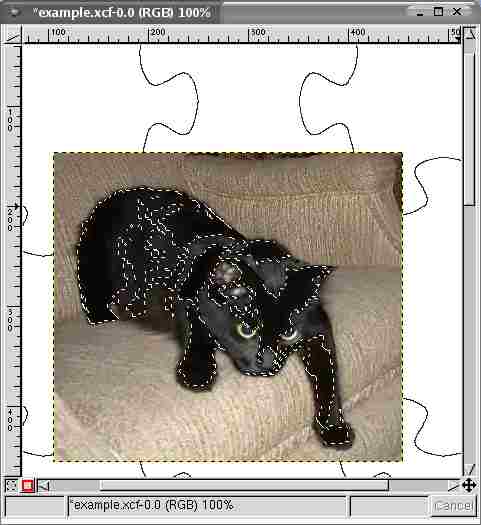
Figure 12. This is what selection outline would look
like if ImgX was the working layer instead of Background.
With B2 selection outline in place, we can now move ImgX around to position it properly. In The Gimp window, click the Move tool.
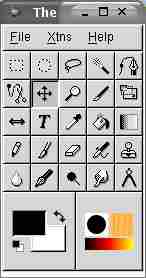
Figure 13. Move tool is the one "pressed
in". If you move the mouse over it, you'll see a tool tip "Move layers
& selections".
That goal may be very difficult to accomplish at first; depending on the nature of an image and the shape of a puzzle piece, it may not be at all possible to overlay the two without cutting someone's head off. :-) I didn't say it was easy, nor that it was worth your time. :-) The obvious difficulty is caused by the shape of the puzzle pieces, the convex and concave parts. Sometimes you'll see that there's no way to create a satisfactory fit between a particular puzzle piece and a particular image. Most likely you'll have to rethink the positioning of some of the images. Here are several tips regarding the whole process.
So, where were we? You moved ImgX around to see if it will fit puzzle piece B2. If it doesn't, delete ImgX layer and try again. To delete ImgX layer, click on the ImgX layer in the Layers, Channels and Paths window to highlight it and then press Ctrl+X. Alternatively, you can right-click on ImgX layer in Layers, Channels and Paths window and select "Delete Layer" from the menu. Then, go back to the window of the duplicate of Image X. You'll have to resize it differently so that it will fit better. Before you do that, you may want to undo the previous resizing (Ctrl+Z), to restore the duplicate of Image X to its original size.
You'll have to repeat Step 2 for each image you want to fit on a puzzle piece. To summarize:
After you have placed an image in its final position, it will extend beyond the edges of the puzzle piece, like it does in Fig. 14 because the image is rectangular, whereas the puzzle piece isn't. Perhaps the image is much bigger than the puzzle piece, if the puzzle piece features only one of many details in the image. You can leave it like that; there's no need to crop the image. After you have placed several images, some of them may start to overlap and your working area (the main image) may get messy, like in figure 14 below:
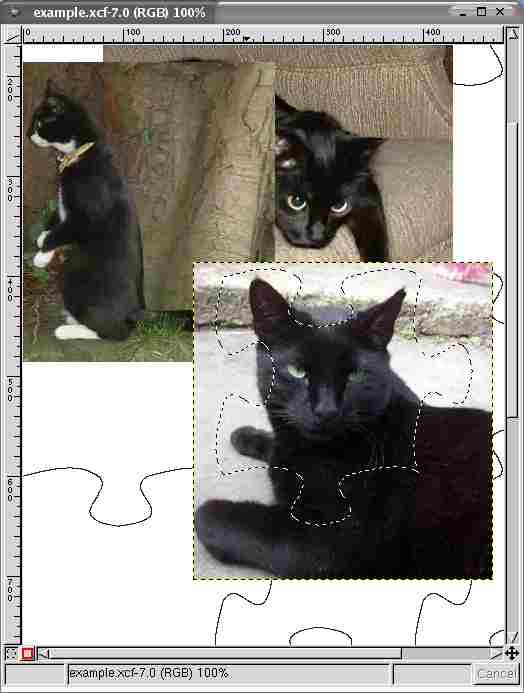
Figure 14. As the layers multiply, images may start to
overlap.
To reduce the clutter, you can make all the layers, except the working layer, invisible. To make a layer invisible, click this layer's eye icon in the Layers, Channels and Paths window. To make it visible again, click in the area of the eye icon, and both the layer image and the icon reappear.
After all the images have been placed, we can cut out individual pieces of the puzzle. We'll do it piece by piece, i.e., layer by layer.
First, we need to add a new layer to the main image. It will be solid white, and we want to make it the second layer from the bottom. What does that mean? In the main image, individual image layers probably overlap each other. Notice that ImgX, the layer added first, is the second from the bottom (the bottom-most is Background) in the sense that all other layers, except Background, overlap it. Each subsequent layer you added overlaps those added before and is overlapped by those added later; the "topmost" layer is the one you added last, and it is not overlapped by any layer. So, the layers are stacked in a particular order: that order is the one you added them in, and it corresponds to the ordering of layers in Layers, Channels and Paths window. We want to make the new layer the second from the bottom: it means it will have to appear in Layers, Channels and Paths right above Background.
In Layers, Channels and Paths window, click Background layer to make it your working layer, and press Ctrl+N. That will pop-up a dialog box New Layer Options. Name the layer "White". Leave its width and height as they are (they should be the same as the width and heigh of the main image). In "Layer Fill Type", check the radio box "White".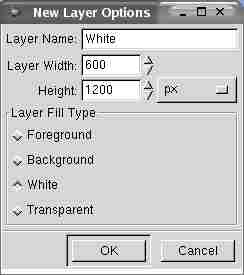
Figure 15. New Layer Options dialog box
The last save. Now is the time you should save the main image for the last time. It already carries as much information as you need for cutting out puzzle pieces. All the other actions we'll do with it in Step 3 will be only temporary and will need to be undone.
Let's say we want to cut out the puzzle piece B2, which overlays with the layer ImgX. It's done in the following steps:
Let's make all the layers invisible, except ImgX and the White layer. (To make them invisible, click their eye icons off.)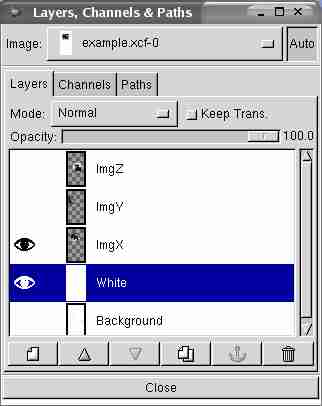
Figure 16. Only ImgX and White layers are visible. All
the other layers' eyes are clicked off.
Make White the working layer. Now we'll temporarily merge it with ImgX. With focus on Layers, Channels and Paths window, press Ctrl+M. A dialog box Layer Merge will pop up. Check the radio box "Clipped to bottom layer": it's important, otherwise the puzzle piece you're about to cut out won't follow the outline defined in the Background.
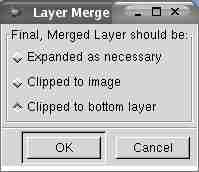
Figure 17. Layer Merge dialog box.
As you see in Layers, Channels and Paths, ImgX layer disappeared, and instead the image that was in ImgX appeared in the White layer. In other words, ImgX and White were merged.
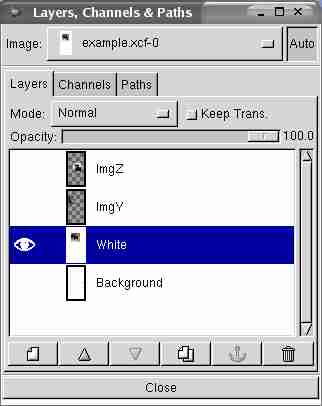
Figure 18. A minuscule icon of ImgX appears inside
White layer icon, but ImgX itself has disappeared.
Now we'll redraw the puzzle, but this time with bevels and highlights. Note: If you rotated your main image after creating the Background puzzle, you need to rotate it as much in the opposite direction (if the first rotation was 90 degrees, this one should be 270; if the first one was 180, this one should also be 180).
Right-click in the main image. Select Filters->Render->Pattern->Jigsaw. In Jigsaw dialog box, set the same number of horizontal and vertical tiles as you did for Background (3 and 6 in the example). Set Bevel Width and Highlight to the numbers you want. If you want thick, noticeable bevels and highlights, you may want to set these numbers to their maximum values, as shown in Fig. 19. The preview Window will give you a rough idea of how the result will look, although I think it exaggerates. Still, if you don't like the result after you clicked OK, undo the action (Ctrl+Z) and bring up the Jigsaw box again with a shortcut Shift+Alt+F, or by right-clicking on the main image and selecting Filters->Re-show Last.
Caveat about Re-show Last.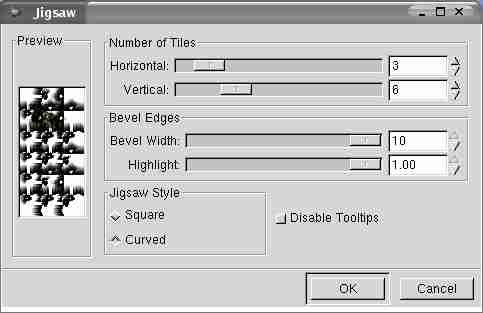
Figure 19. Jigsaw dialog box with bevels and
highlights set to their maximum values.
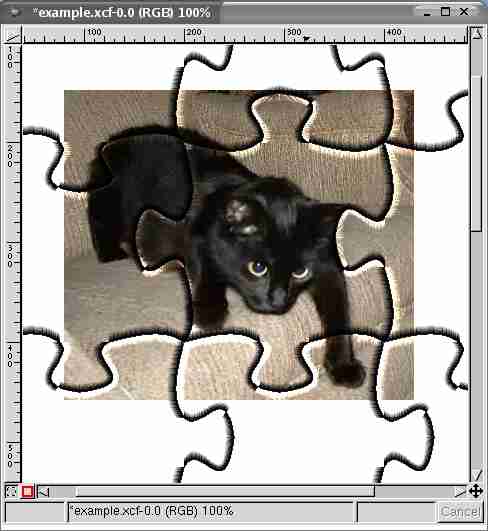
Figure 20. And this is the result. This is how ImgX
looks when the puzzle is redrawn with maximum bevels and
highlights.
After you set the desired bevels and highlights, you are ready to cut out B2 with a picture on it. At this point the shapes of the puzzle you have just drawn should be identical to the ones drawn in the Background layer. To verify that they are identical, make Background your working layer. With the Fuzzy selection tool click inside B2. The selection outline you'll get should coincide with the outline of the newly drawn puzzle, as in Fig. 21:
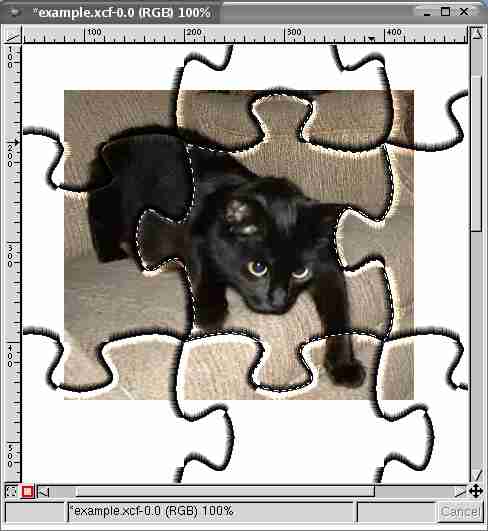
Figure 21. ImgX outline in the newly drawn puzzle
coincides with its outline in Background layer.
If it does not coincide, there are 2 possible reasons:
Now make the White layer your working layer. Put the focus back on the main image. Press Ctrl+C. You have just copied B2 with the image of it.
Next, let's paste B2 into a new image. Bring up New Image dialog box. Notice the Width and Height numbers. They are the exact dimensions of B2: Gimp is smart enough to anticipate that you may want to paste what you've just copied into the new image. In the New Image dialog box, "Fill Type" section, click the radio box "Transparent". Click "OK". You'll get a new image. Click Ctrl+V, and the B2 will be pasted into it. As usual, it will be pasted into its own layer, called "Floating selection". This time you can either rename the "Floating Selection" and thereby put it in its own layer, or let it merge with the Background: either way is fine.
When you pasted, did you get a ImgX image in B2 shape, as in Fig. 22 or did you get a white blob in the shape of B2?
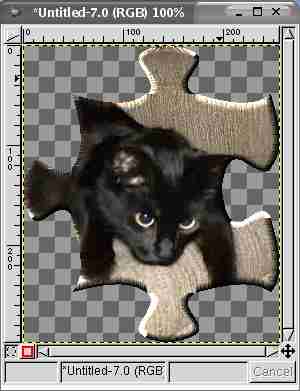
Figure 22. A new image with ImgX pasted into
it.
If the latter, your error was not having made the White layer your working layer in the main image before you pressed Ctrl+C. If the working layer at the time was still set to Background, you have copied a piece of Background (a white B2-shaped blob), not a piece of White layer. That, again, is an idiosyncracy of layers and the beauty of them. Whatever you are doing to the image you are doing only to the working layer. (Though there are some exceptions to that which we won't cover here.)
The Undo step. We now need to undo the drawing of the puzzle and the merging of the ImgX and White layers, because we'll need to repeat these steps with each of the rest of the layers in the main image. So put the main image into focus and keep clicking Ctrl+Z until you undo the puzzle and ImgX layer reappears in the Layers, Channels and Paths window, i.e. separates from the White layer.
Preparing the new image for the web. To create a puzzle effect in an HTML page, our puzzle pieces must have a quality called transparency. In simplest terms that means that the background of the web page must be visible through the image background. This lets us create images in various shapes, e.g. round, instead of being limited to the rectangular shape. An image that looks round is still rectangular, but the part on the outside of the round shape is "transparent": that is, the web page background shows through it, causing the image to appear round.
Same with the puzzle pieces. Despite the intricate shape of a puzzle piece, the image that holds it is still rectangular. So when we embed them in a web page, we'll need to overlap them in such a way as to make them appear to fit together like a jigsaw puzzle. For that we need to make all of them transparent.
The two most popular image formats that support transparency are GIF and PNG. Open source ideology would call for use of the PNG format, because, unlike GIF, it is unconstrained by patents. However, I went with GIF out of habit and because of some residual unease associated with PNGs. A few years ago PNG was a new format, not supported by all browsers. Now I believe it's supported by practically all browsers, and yet I'm a slave to the old habit of prefering GIF over PNG. :-) So further I'll explain how to create transparent GIFs. Creating PNGs is even simpler, if you are curious.
First you need to convert the new image (one that contains B2-shaped picture) into an indexed color scheme, because this is the color scheme that supports transparency. The default color scheme in GIMP is RGB (same as JPEG format uses), and it does not support transparency; hence, JPEGs can't be transparent. To convert the new image to an indexed color scheme, put it into focus and hit Alt+i, or right-click on it and select Image->Mode->Indexed. In the Indexed Color Conversion dialog box that pops up, accept all defaults and click "OK".
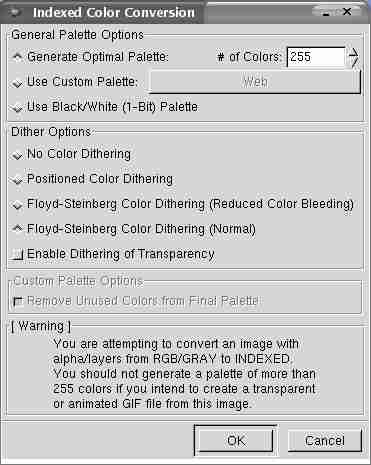
Figure 23. Indexed Color Conversion dialog box
Now right-click on the new image and select File->Save As. In "Selection" field, type in the file name. Set "Determine File Type" to GIF. This will automatically add a .gif extension to your file name. Click "OK". You'll get another dialog box, Export File. The default should be set to "Merge Visible Layers"; leave it like that. Click "Export".
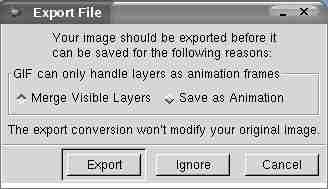
Figure 24. Export File dialog box
You'll get yet another dialog box, Save as GIF. It would be important only if you were creating an animation. As it is now, all you can do is enter a comment in the "GIF comment" field if you want; to tell the truth, I've no idea how would I ever view that comment, short of loading the image back into GIMP; is there a software other than GIMP that shows GIF images' comments? But I digress. Click "OK".

Figure 25. Save as GIF dialog box
You finally have the first puzzle piece. Congratulations! (Actually, if you rotated your main image during the process, you no doubt noticed that you now need to rotate the puzzle piece back into the upright position.) Now all you have to do is repeat step 3 for as many times as you have layers. (Make ImgX layer invisible, make another layer, say, ImgY visible, merge it with White layer, etc.) What can be easier! Actually, once you memorized the keyboard shortcuts, it can all be done very quickly. It's just mechanical work from this point on, no creativity required.
You may ask, why can't we cut out all or at least several puzzle pieces at a time? We can. But, depending on how many puzzle pieces you have, it may become complicated. In my case (in my real pages, not this cat example), the complicating factor was that the images in each layer were quite a bit bigger than their designated puzzle piece. Typically each of my puzzle pieces focused on only 1-2 details in an image. That caused the rest of the image to extend way beyond the boundary of the puzzle piece. In such case, if you make too many layers visible at the same time, they'll overlap and intrude into each others' territory, making it impossible to cut them out all at the same time. But in principle you can cut out several pieces with only one puzzle drawing.
For that, you have to determine which layers are feasible to cut out in one drawing, i.e. which ones don't intrude upon each other. In this example, such layers are ImgY and ImgZ. White ImgZ (the bottom cat) overlaps a small part of ImgY (the leftmost cat), the part it overlaps is not inside ImgY's puzzle. On the other hand, ImgY overlaps a significant part of ImgX, so I can't cut out ImgX and ImgY together.
If I wanted to cut out ImgY and ImgZ together, I would make ImgX invisible, leaving only ImgY, ImgZ and White layers visible, and then merge these 3 layers. Then I would draw a beveled puzzle on the merged layer, as in Fig. 26
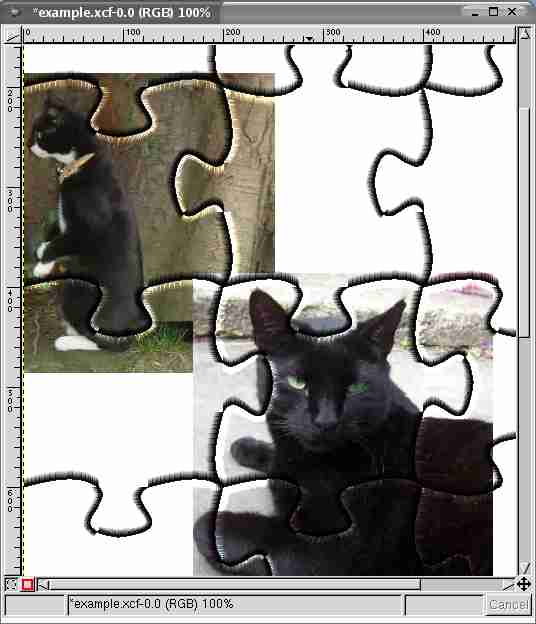
Figure 26. After all three ImgY, ImgZ and White layers
were merged, a beveled puzzle was drawn over both ImgY and ImgZ,
enabling them both to be cut out with just one puzzle drawing
operation.
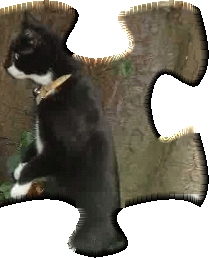
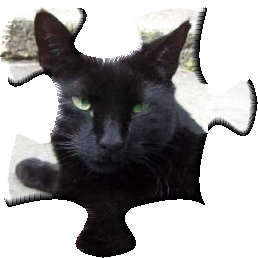
Figure 27. These two separate images is what you get
after cutting out ImgY and ImgZ from the example above.
For the sake of completeness I should mention (although you can easily figure it out for yourself) that sometimes you can minimize the overlap by changing the stacking order of layers. You can change their stacking order (i.e. lower or raise certain layers, therby making them overlap fewer or more layers), by clicking the "down arrow" or "up arrow" buttons in the bottom toolbar of Layers, Channels and Paths menu.
Creating text. The text that appears when you move the mouse over a puzzle piece is a .gif image too. To create it, put the focus on the window of the B2 GIF you've just created, and create a new image. In the New Image dialog box the Width and Height should be the same as those of the B2 image, and "Fill Type" should be set to "Transparent". Click "OK". Right-click in the resulting image and select Filters->Render->Dynamic Text. The GDynText dialog box that you'll see is pretty intuitive. Type your text, in several lines if you want, and assign font, its size, alignment, etc. Be warned, though, that some fonts, when you click "OK" or "Apply", will complain that there is no such font. It's my impression that ALL but the simplest fonts do that. I don't know if it's because I neglected to install the rest of the fonts. If I ever get to trying to download and install more fonts, I'll post an update. For now, I found myself limited to only the simplest fonts, alas.
After you clicked "OK", the text you typed became its own layer, enabling you to move it around in the image.
Saving. This is a good place to save this little image, and I recommend saving it as GIMP XCF format, since it will preserve the text in its own layer. Useful if you decide to edit or move it later. If you save it in any other format, the text layer will merge with the background and become uneditable.
If you decide to change the text or put the line breaks in other places, or something, bring up the GDynText dialog box again. (If Dynamic text was the last operation you did, use Re-show last by hitting Shift+Alt+F.) The dialog box will contain the previously typed text.
After you are satisfied with the text, save it as a GIF. [How to save a file as GIF.]
Here is another of my antiquated Gimp tutorials: Creating wavy buttons.